
Well, we’re now officially in lockdown in Ireland, also known as the golden age of video chat. (I had three video conversations yesterday evening, which is more than a little exhausting for an introvert like myself.) It also might be the golden age of sourdough baking. All of a sudden almost everyone is stuck at home, with large stockpiles of flour that need to be turned into something, and sourdough was already having a moment, even before all of this.
Since I’ve stuck images of my loaf attempts up on Instagram, a couple of people have asked me how to go about it. Why they’re asking me when there are literally thousands of YouTube videos on the subject, I don’t know, but I thought I’d explain my own method anyway. I may not be a baker, but I am a technical writer, and if there’s one thing I can do, it’s write instructions.
Necessary caveats before we get started: This is my method, cobbled together from various sources, and it shouldn’t be seen as the best way to do anything. It changes from week to week and will probably continue to change as I come across new ideas. Yours should too — take everything below as a starting point, or even just as a collection of ideas to pick and choose from.
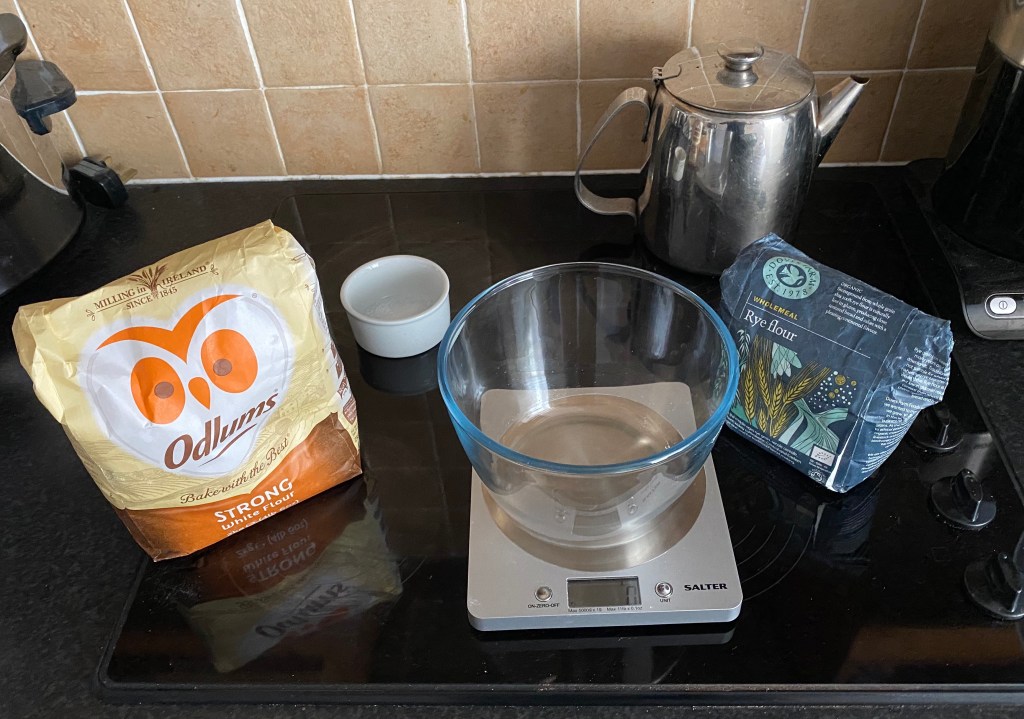
Beyond the ingredients, you’ll need:
- A couple of bowls, one large and one normal sized
- Cling film and a tea towel to cover the bowls
- A set of scales for measuring — everything is done by weight below.
- A dough scraper (this is a piece of hard plastic with a curved scraping edge — they’re cheap and easy enough to find and they’ll make your life a lot easier)
- A container for your starter, which should have a cover and be made of glass or clear plastic
- A cast iron Dutch oven and a baking tray or shallow dish (these are optional, but they help the final result)
- A willingness to get your hands covered in sticky dough
The Starter
Sourdough is pretty simple in terms of ingredients. You don’t need anything more than flour, water, and salt to begin with. The flavour and rise come from the sourdough starter, a culture of natural yeasts that you feed on a regular basis and use in place of store-bought yeast.
There are two ways to create a sourdough starter. The first is to grow your own, which is a complicated and tricky task, and I have no intention of going to go into that here. If you want to know more, seek out Seamus Blackley on Twitter, as he‘s something of an expert. Instead, I’d recommend the second option: get someone to give you some of their starter.
I got my starter as part of a one-day course at The Baking Academy of Ireland. Many sourdough starters that you’ll see on YouTube or TV are goopy messes that need to be fed every day, like a demanding child. You don’t need that, and I don’t have the patience for that. Mine lives in the fridge and gets fed once a week.
Perhaps it’s a good thing I’m not a parent.
To feed this “Hard Levain” starter, do the following:
- Take the 80 grams of starter you begin with and split it into lumps of 20 grams and 60 grams. Put the 60 grams aside.
- Put the 20-gram lump in a bowl and add another 20 grams of warm water to it. Mash it around in the water until you have a milky, lumpy liquid.
- Add 40 grams of flour to this liquid. I use a mix of strong/bread flour and rye flour, in a ratio of approximately 5–1.
- Stir and mix the flour and liquid together for a while. Once all the flour is incorporated, you should end up with an 80-gram dough ball.
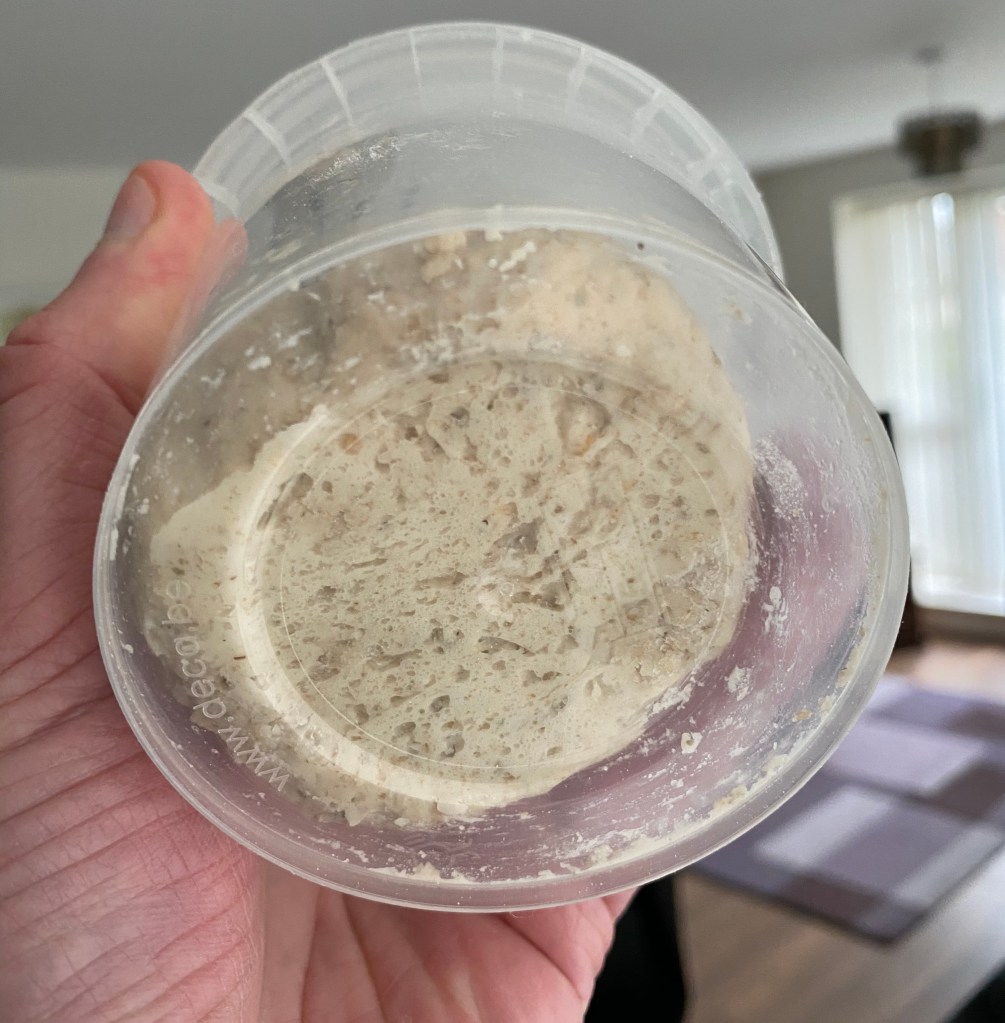
- Put the dough ball into a clear, covered container (I use old plastic takeout pots) and set it aside for four to six hours.
- At the end of this resting period, check the bottom of your container. You should see bubbles forming at the base of the dough ball. This means the natural yeasts in the starter are getting to work, eating up the flour.
- Stick the container in the fridge. This will slow down the yeast, so that you don’t need to feed the starter again for another week. When you do, just start again from the top.
You don’t need to wait a week to bake with the starter. Just feed it every time you do. Also, if you forget to feed it once a week, the yeast can probably be revived. It just might need to rest for a little longer in step five.
As for that 60 grams we set aside in step one? There are three things you can do with that. If you’re just feeding the starter and not planning on baking, you can throw it out. I wouldn’t blame you — I’ve done it myself. Despite all the benefits, baking sourdough can require exhausting work and forethought. Again, like children.
The second option is to share your starter. Split the 60 grams up into three 20-gram portions and feed each as in the instructions above. In these lockdown times, sharing samples of biological materials is probably a no-no, but I can arrange dead drops for anyone who’s interested. Not abroad though — I don’t want to end up in jail over this (and the starter likely wouldn’t survive).
The third option, of course, is to bake. So now we get to the fun part.
The Loaf Itself
All the Ingredients
As stated above, this process is almost certainly not the best one to use. It’s just the one I use to get the bread you see in the images all over this page. It’s also prone to change due to experimentation and forgetfulness. I can say that one advantage of sourdough is that it generally tastes good, even if it doesn’t turn out looking the best.
The instructions below ended up a bit lengthier than I expected them to be, but it’s important to note that making sourdough involves a lot of waiting. Only the kneading requires consistent effort, and even that’s only for 10–15 mins. Amid all of the waiting, you can, and probably should, be able to do any amount of other things.
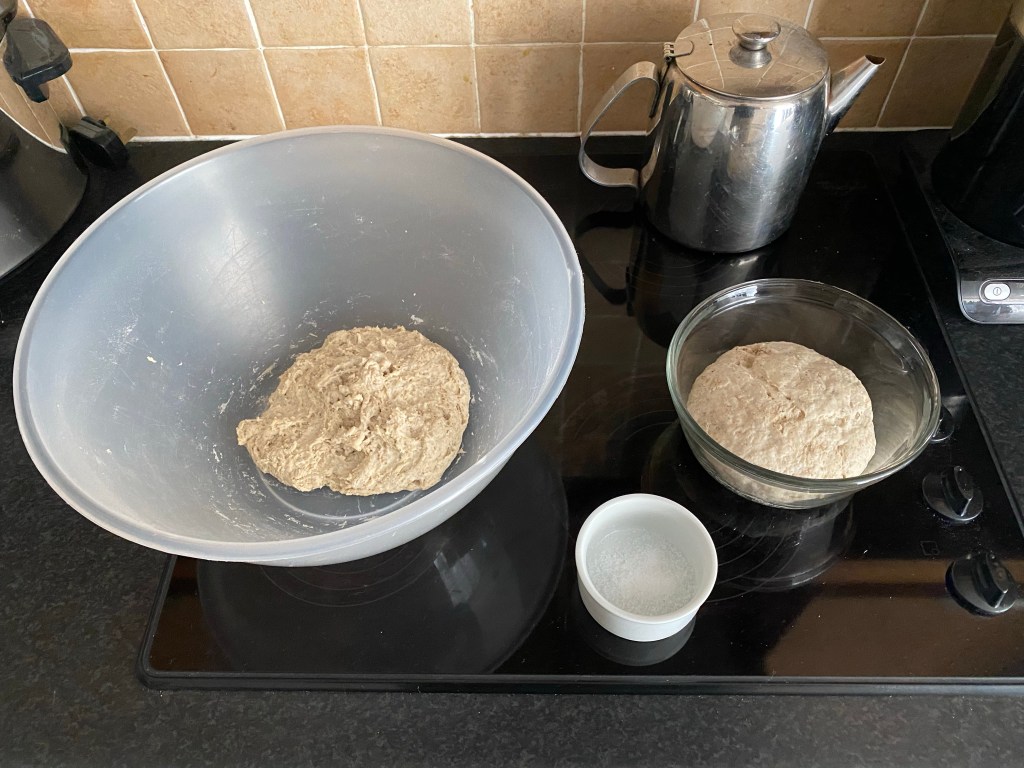
Stage one is to take the 60 grams of starter and turn it into more starter for the planned bread. You’ll need to do this a day or two ahead of when you actually want to have an edible loaf, so bear that in mind.
- Put your 60 grams of starter in a bowl. (I like to use Pyrex/glass so I can check the state of the starter, as above, but it’s not mandatory.)
- Add 65 grams of warm water, and once again mash and mix the two together until you have a milky, lumpy liquid.
- Add in 120 grams of flour (100 grams of bread flour and 20 grams of rye flour for me) and 1 gram of salt.
- Mix the whole thing together until you have another, larger dough ball.
- Cover the bowl with cling film and set aside to rest for 18–20 hours, until it’s doubled in size and has all those lovely bubbles visible from below.
This gives you the starter for your loaf. Once it rises, you’ll need to add it to your “autolaise” to create your dough. The autolaise itself is pretty simple: just add 290 grams of flour (250 grams of strong flour, 40 grams of rye flour) to 215 grams of warm water in a large bowl to form a sticky mess. Set that aside for at least half an hour to rest, covering the bowl with a tea towel.
While all of that is resting, measure out another 8 grams of salt into a small container. It’s the last thing you’ll need for the loaf, and you’re now ready to start.
Build Your Loaf
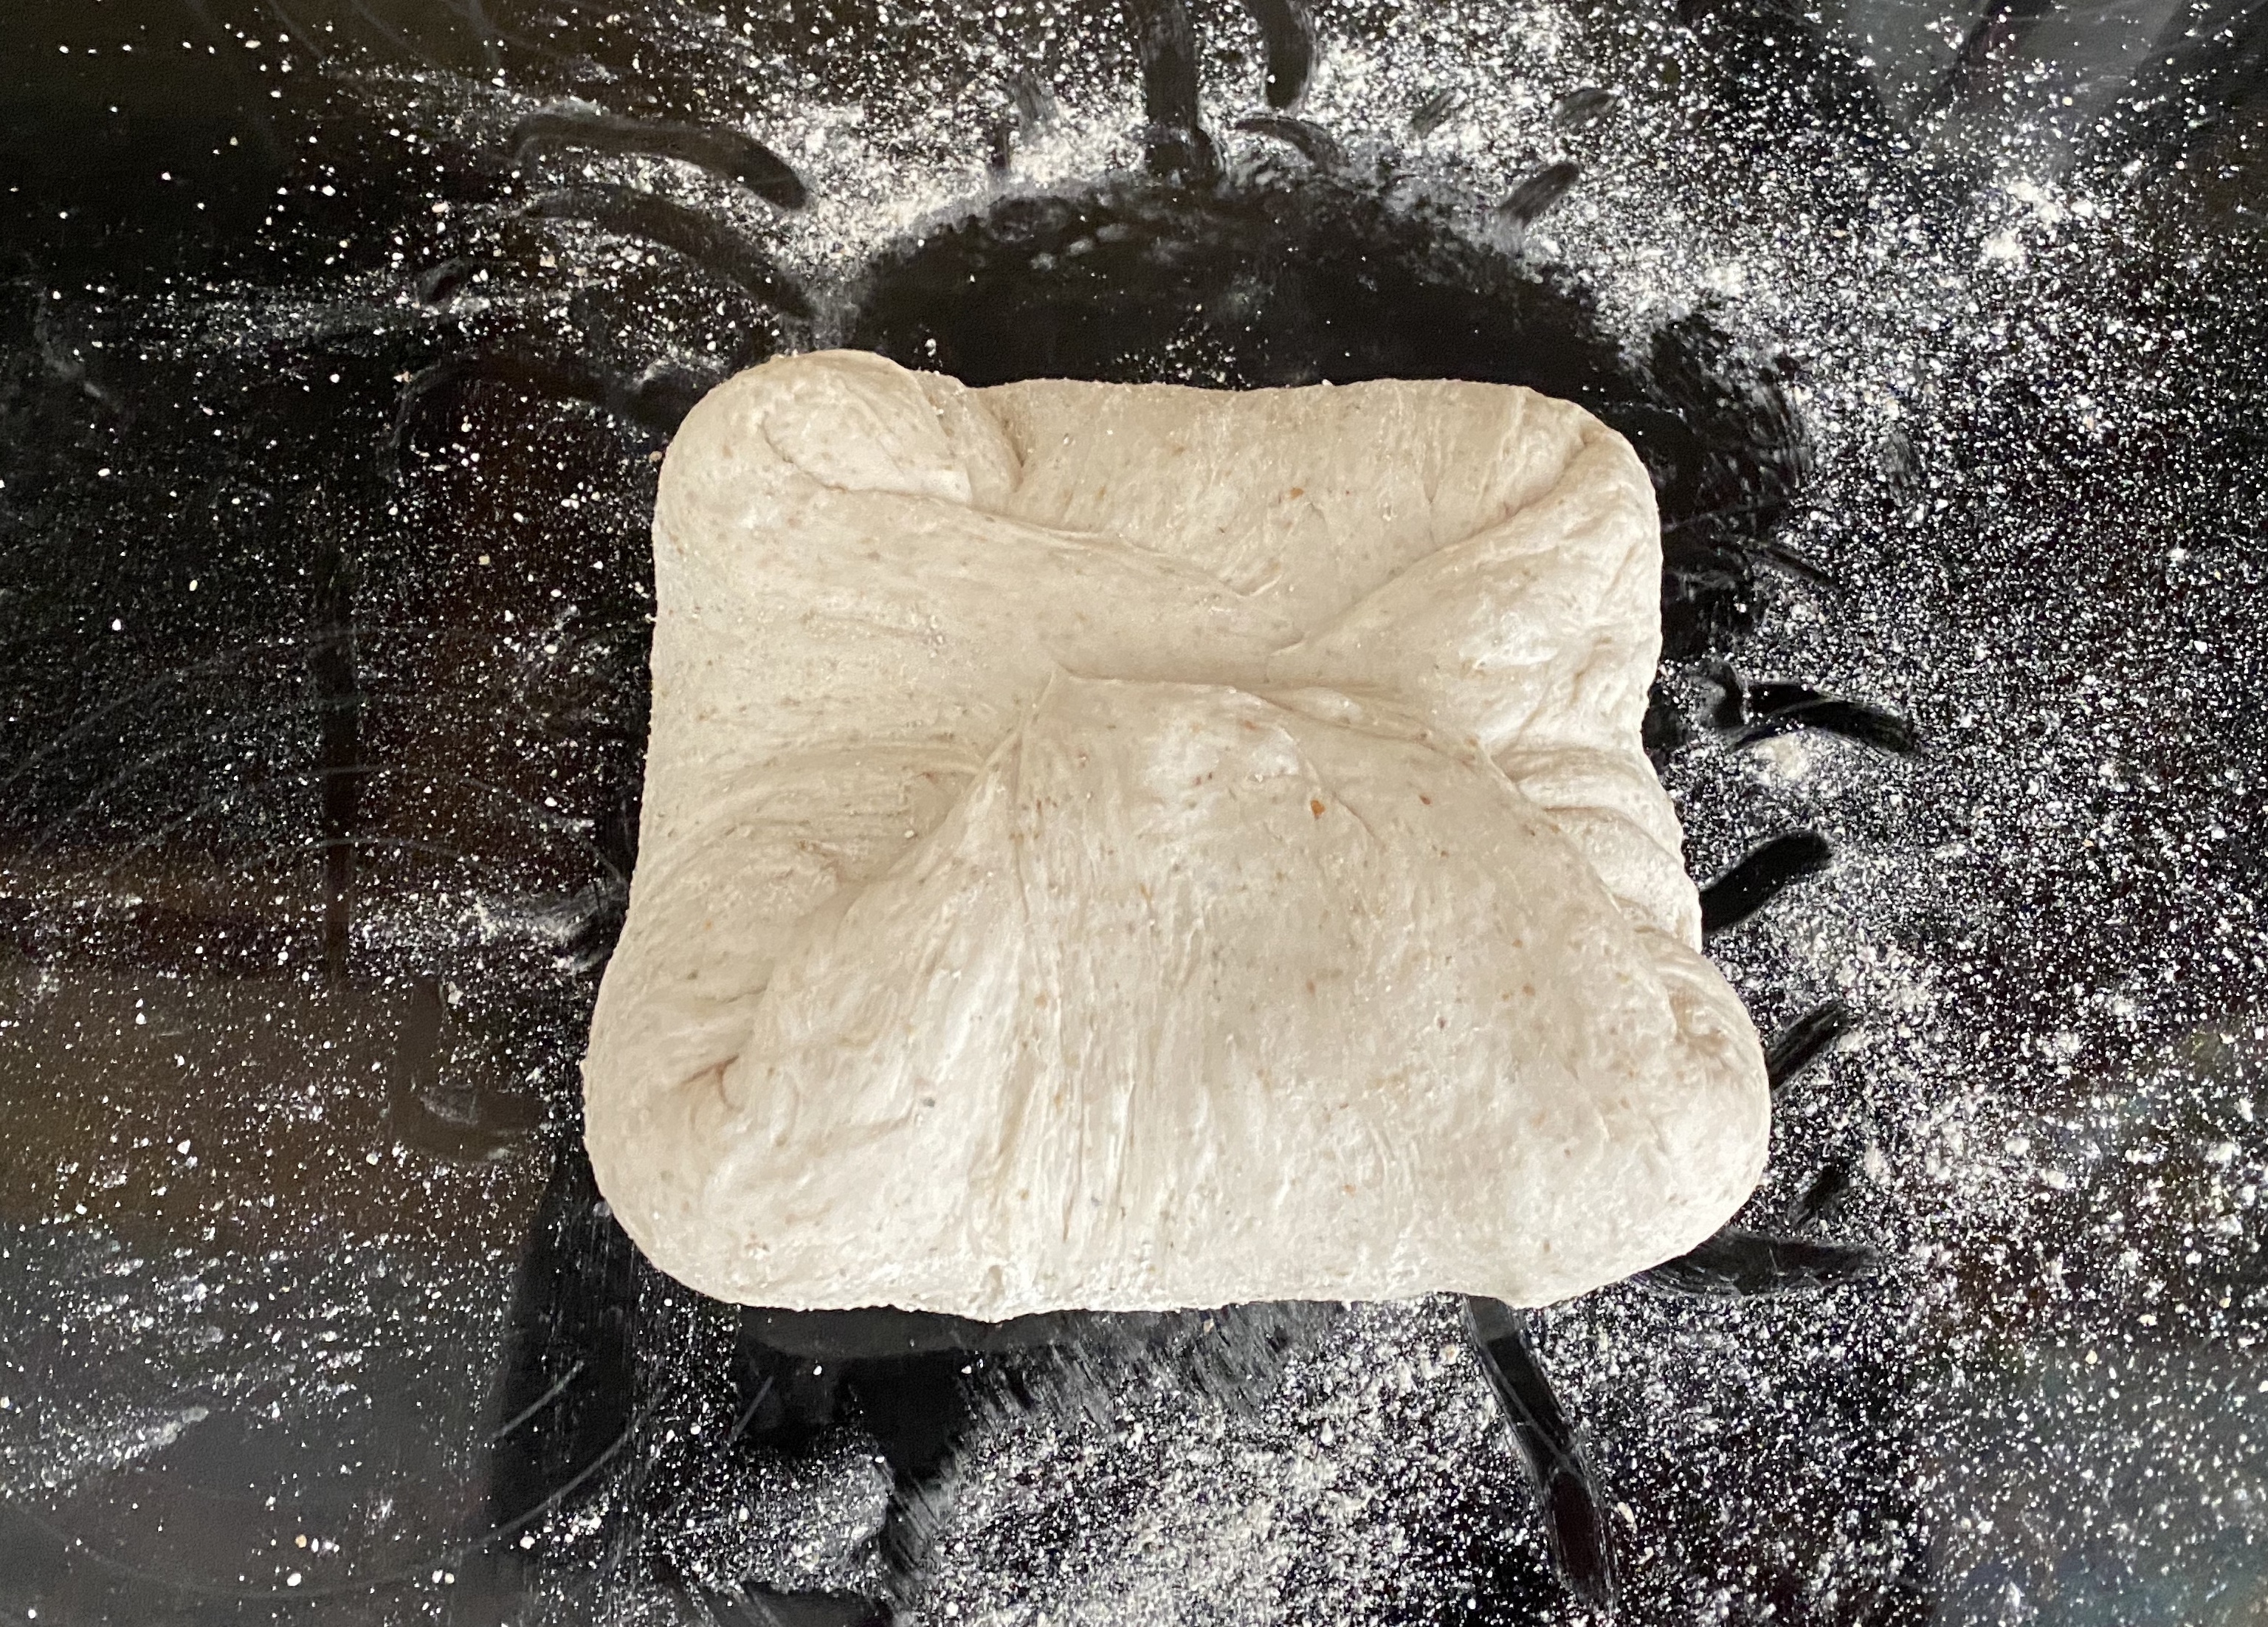
Uncover the squidgy mess that is your autolaise, in which all the flour should now be properly hydrated. Scatter over the salt, then use your dough scraper to remove the starter from its bowl and add it to the party in the larger bowl.
With damp hands (so the dough doesn’t stick as much), take a few minutes to mix the ingredients together. Do this in the bowl so that the salt doesn’t scatter everywhere before it’s properly mixed into the dough. Once everything is incorporated, use the dough scraper again to turn the dough out onto a smooth (non-floured) surface.
You are now ready for the form of exercise known as kneading, or alternatively, smacking the crap out of your dough.
There are lots of techniques for doing this, all of them with the goal of developing the gluten in the dough, and I’m not going to pretend that I’m particularly good at it. However, in the interests of completeness, I will describe my preferred technique: the slap and fold.
- Grab the lump of dough with your clawed fingers from front and back.
- Lift and turn it 90 degrees, so your hands are to either side.
- Slap the dough down onto the surface, as if it was a towel you were smacking someone with (this is the best metaphor I can come up with and it’s not a good one — really, watch YouTube to get your own technique).
- Fold the dough that remains attached to your fingers over the slapped dough.
- Grab once more from front and back and repeat.
This will occupy 10-15 mins of your time, during which the dough should become more coherent and stretchy. Essentially, kneading it in this or any other way improves its internal consistency. It will also exhaust you, so have some TV, podcast, or music entertainment on and run a timer while you work. At the end, you’ll probably have to use the dough scraper to scrape dough from your fingers too.
Ideally, the dough should become stretchy enough to stretch to almost transparency without tearing, but I find that hard (and not entirely necessary) to achieve. Once you’re happy enough with the dough, scrape it up and put it back in the big bowl. If it’s still noticeably sticky, you might like to scatter some flour over the top of the dough, then use the scraper to flip it over, so the floured side is down.
Don’t worry — the kneading was the hardest work you’ll do. We’re on the home stretch (ahem) now.
Next comes a bit of repetition. Cover the bowl with a tea towel and wait for an hour. At the end of the hour, uncover it, grab a side of the dough, stretch it out, and fold it over the dough itself. Turn the bowl and stretch and fold again, until you’ve done it five times and your dough looks like a squishy pentagon. Cover for an hour and do this again. Then cover for another hour and do it again.

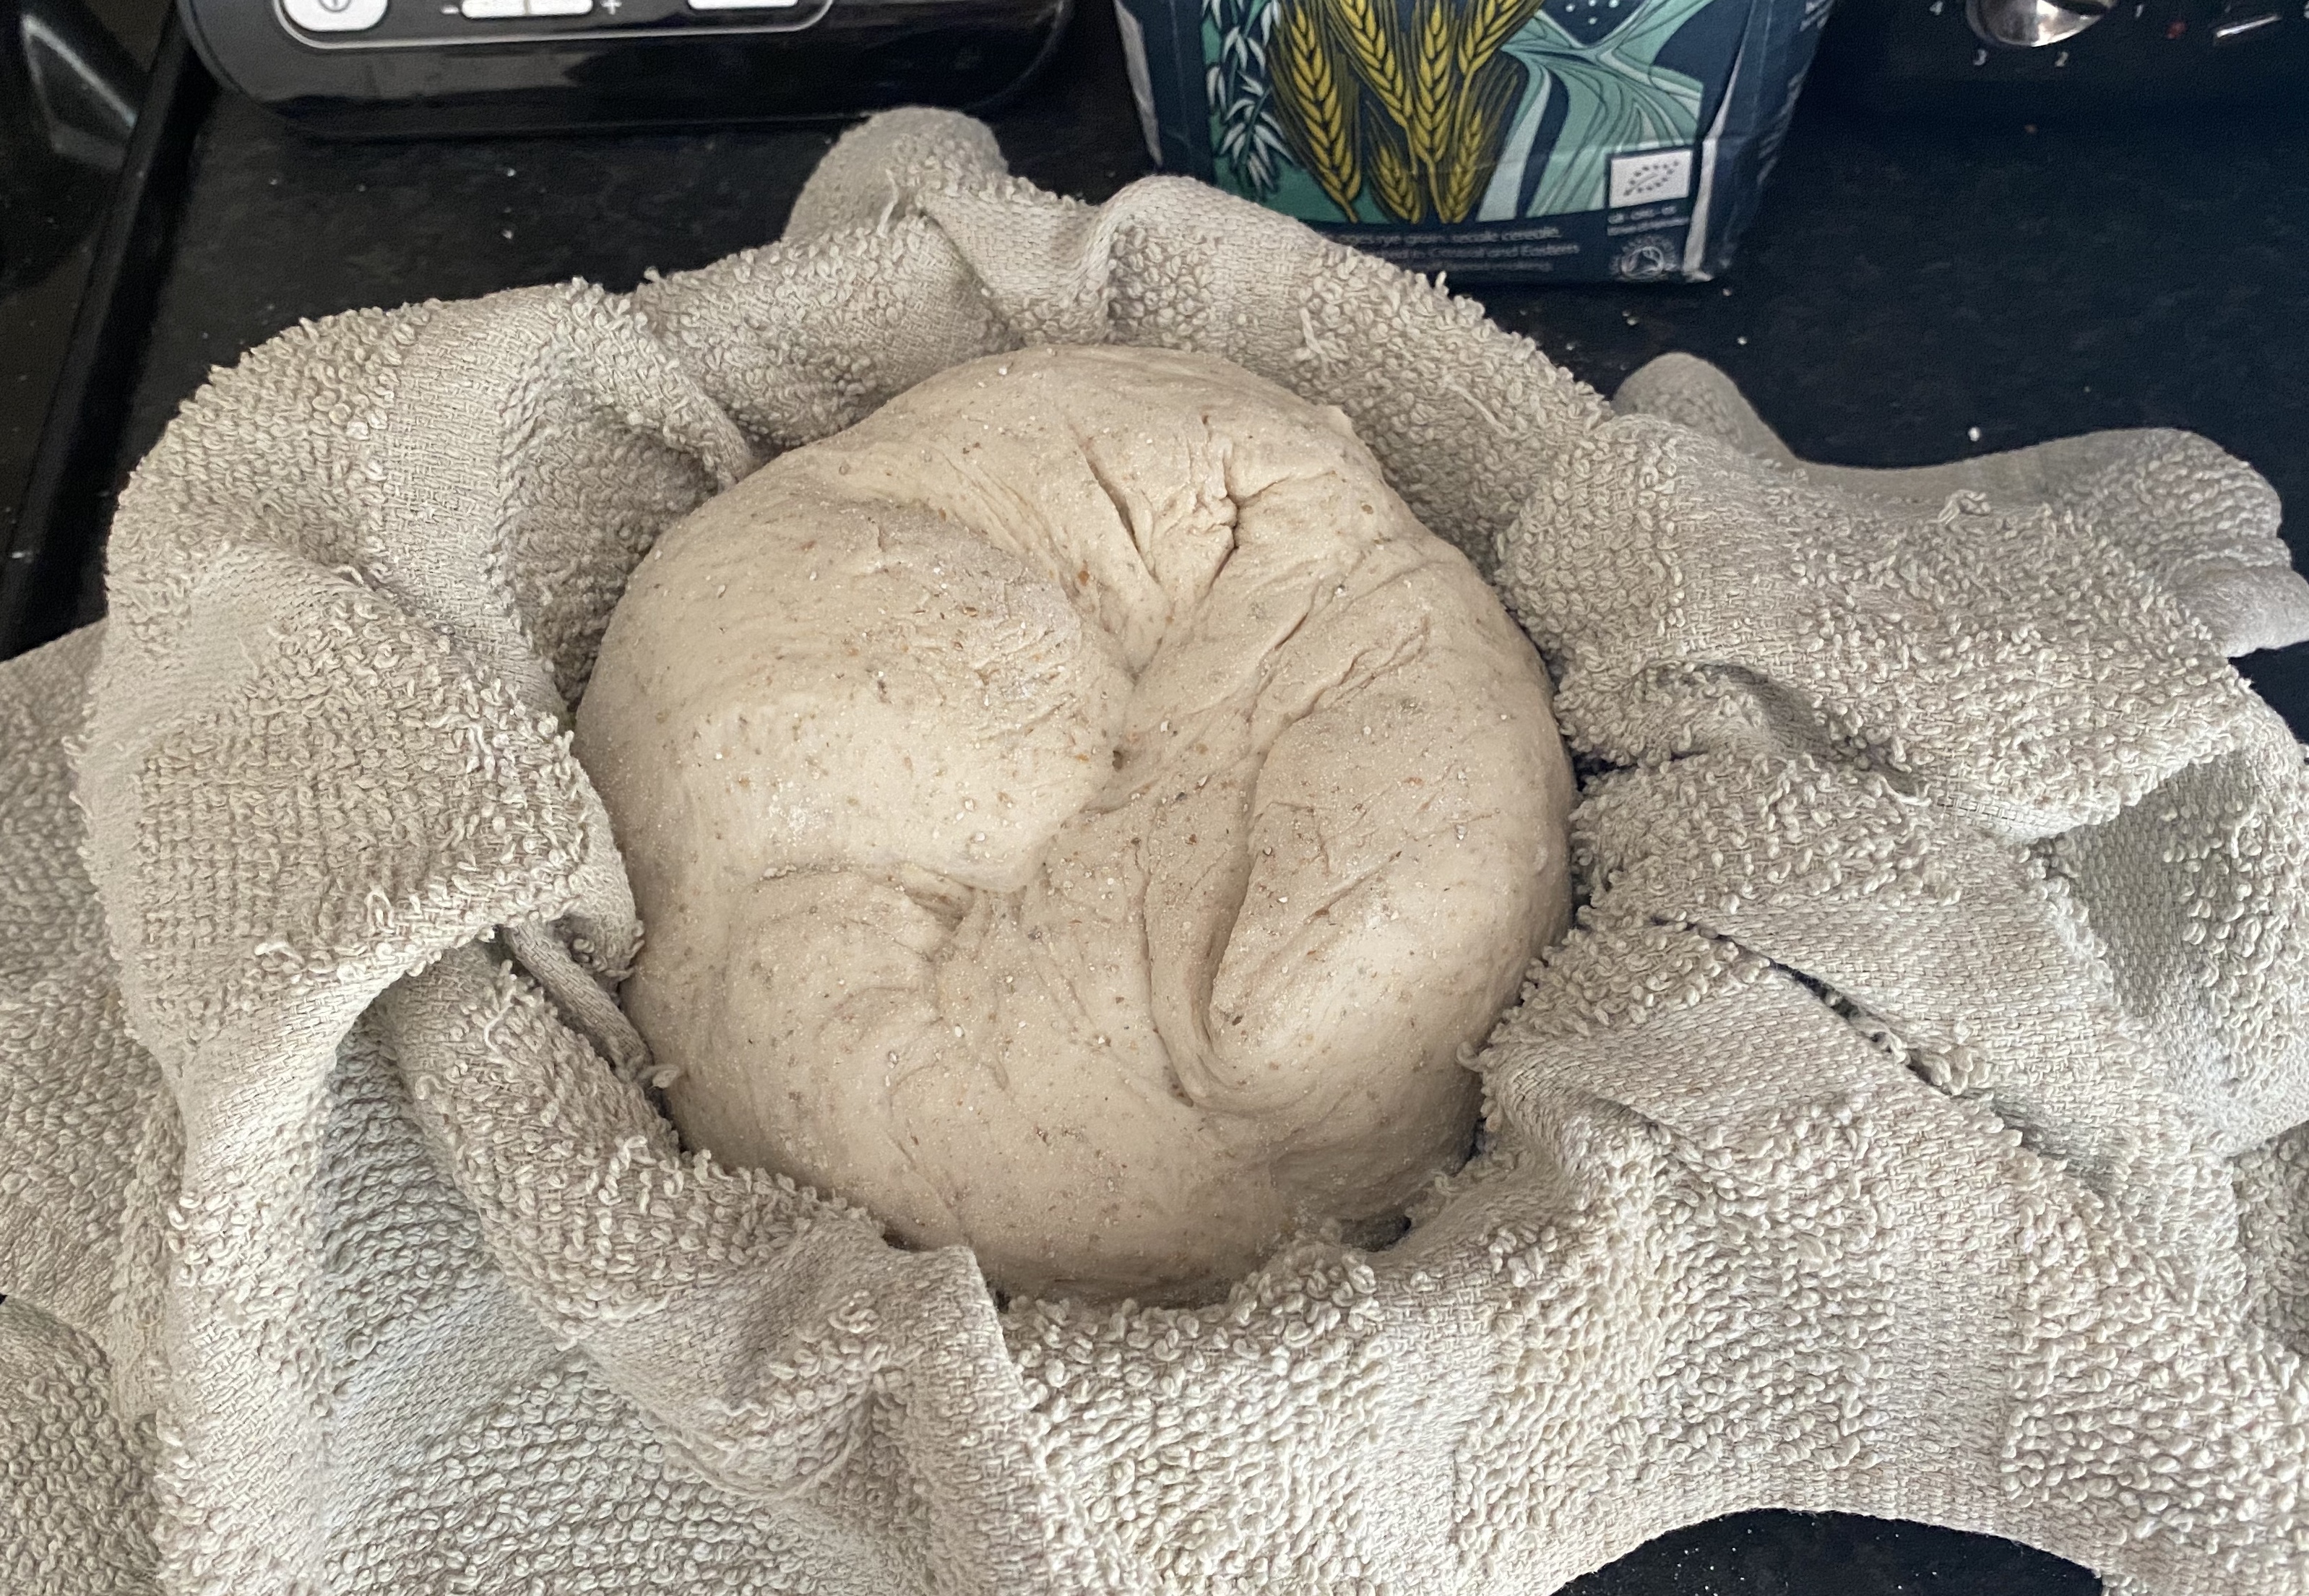
After your third stretch-and-fold session, leave the dough covered for another 20–30 mins. Next up is the final shaping. This is traditionally done in a basket called a banneton. If you have one of those, you are far more fancy than me. I use a bowl and a floured tea-towel.
- Take the tea towel that was covering your dough and use it to line a small bowl. Liberally scatter rye flour on the inside surface of the tea towel.
- Scatter strong flour on a surface and turn your dough out onto it.
- Grab the bit of the dough furthest from you and fold it over the rest of the dough.
- Grab the left side of the dough and fold it over to the right.
- Grab the right side of the dough and fold it over to the left.
- Grab the nearest edge of the dough and fold it away from you.
- Use the dough scraper to flip the dough package you’ve just made, so that the folded edges are down.
- Place one hand on each side of the dough, in contact with the surface, and slowly turn the dough, tucking its edges in under itself, until you have a rounded boule.
- Once again, use the dough scraper to flip the boule into your hands and drop it into the tea towel-lined bowl (or banneton, if you must) with the folded side uppermost.
- Fold the excess parts of the tea towel to cover the dough. (This isn’t necessary, just neat.)
The next bit is your choice. You can either let the dough boule rest in the bowl for an hour and a half, or stick it in the fridge overnight. Either way, the dough should double in size. If it hasn’t risen when you take it out of the fridge, leave it to warm for half an hour while you prepare for … the baking!

The Baking!
Yep, after everything you’ve gone through, you’re almost ready to have edible bread. I hadn’t expected these instructions to run on for so long. Honestly, you should’ve just watched YouTube instead.
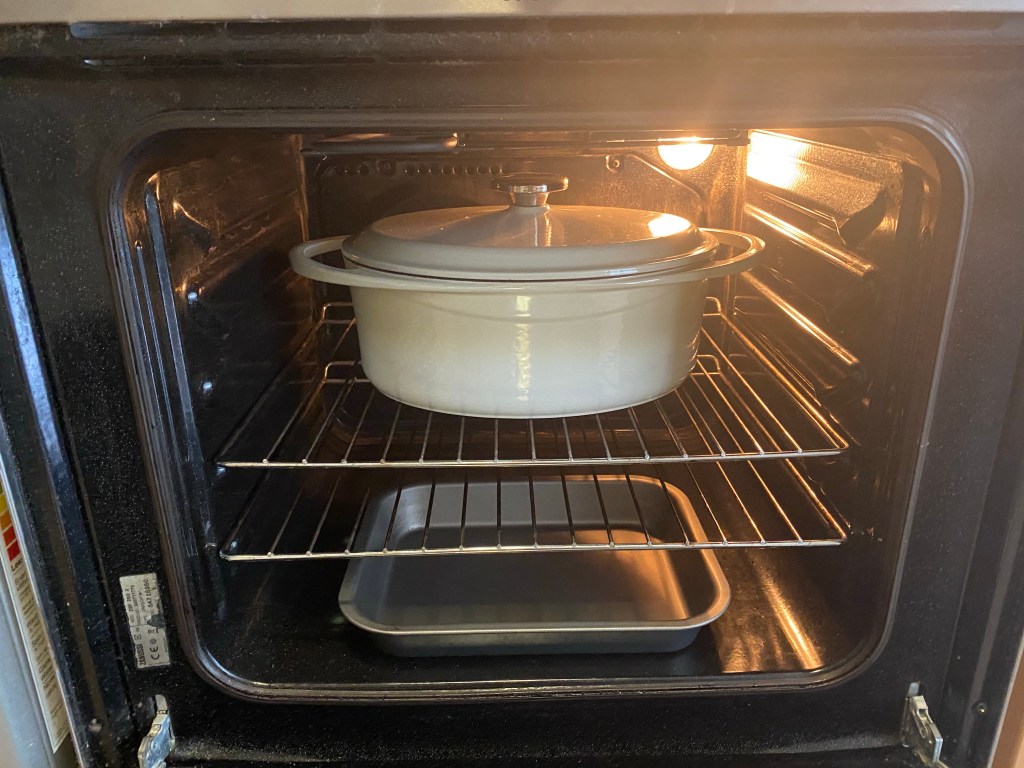
Anyway, take your cast iron dutch oven and put it in the oven. At the bottom of the oven, put a baking tray. Turn the oven to 220º C.
While the oven is warming, spread out a large sheet of baking paper and scatter flour (any flour will do) over it. Turn your shaped dough out onto it. You should see the shape of the towel impressed into the dough. It won’t be as nice as a banneton would have been, but that’s okay. We’re not that fancy.
Using a freshly sharpened knife or a razor blade, slice into the top of the dough. (There’s a specific baker’s tool for this too, but I’m still not a baker and still not that fancy.) Slice your initials, if you like.

Once the oven has warmed, take the dutch oven out, take its lid off, and use the baking paper as a sling to drop the dough into it. Put the lid back on and put the dutch oven back into the oven. Wait 20 minutes. Perhaps breathe a sigh of relief that your long sourdough nightmare is at last almost over.
Before the 20 minutes are up, start a kettle boiling. You probably should have done that instead of all that sighing. At the end of the 20 minutes, open the oven and take the lid off the dutch oven. Your loaf should have expanded under its own steam, but now it needs more steam to brown properly. Pour boiling water from the kettle into the baking tray in the bottom of the oven. Close the oven and turn the temperature down a little to 210º C.

This last bit is somewhat subjective. After a further ten minutes, take a peek into the oven. How brown is your loaf? If it’s not brown enough, close the oven up and keep baking. Check every five minutes or so. I like to bake until the tips of the crust on top are almost burned, but your mileage may vary. Once it’s the colour you want, turn off the oven, remove the dutch oven, and carefully extract the loaf, placing it on a wire rack to cool.
And cool, and cool. No, it doesn’t matter how nice it smells. Leave it until it’s properly cooled. At least three hours.

And that’s it. You should now have your loaf. Hopefully you have a decent bread knife and something to spread on the slices too. However it looks, I hope it’s tasty. Thanks for reading through all of this, and if a little sourdough helps you get through all that the world is going through right now, then maybe writing all of this has been worthwhile.
Cancer Update
A quick one on this front. Not much change from my last report. As Covid-19 cuts a swathe across the world, people being treated for cancer, and especially lung cancer, have more reason than most to avoid infection. Thanks to my particular treatment, I’m not immunocompromised, but I’m still going to be avoiding people as much as I can for the foreseeable future. For the moment at least, I feel good and am getting as much exercise as I can. Next week is my scheduled CT scan, after which I should know more about how things are progressing. Fingers crossed.
